How To Add Rate
- Click on ‘Add Rate’ function.
Result: The Add Rate screen will display.
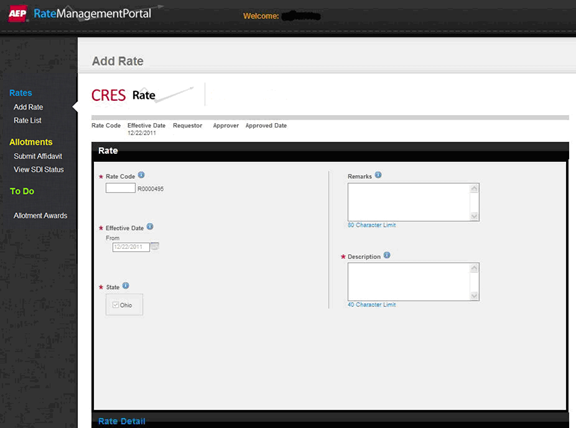
- Enter the following fields.
Rate Code: Required field –
Rate Code is a unique identifier of the rate. It is a total
of 12 alphanumeric characters. The first 4 characters are required
to be entered and the last 8 characters are system generated
Effective Date: Required field -
The effective date of the rate is defaulted to a date 6 days from
the current calendar date. It may be changed to a date greater
than the default date
Remarks: Optional field - Free
format text may be entered to any rate code when the code is created
Description: Required field
- Description of the rate entered at the time the rate code is created.
(40 characters – free-form text) This field may be used in the
future to display on the Rate Ready bill.
RATE DETAIL
- Next, click on ‘Rate Detail’
at the bottom of the Add Rate screen. The Rate Details screen will
display and allow entry to the following fields:
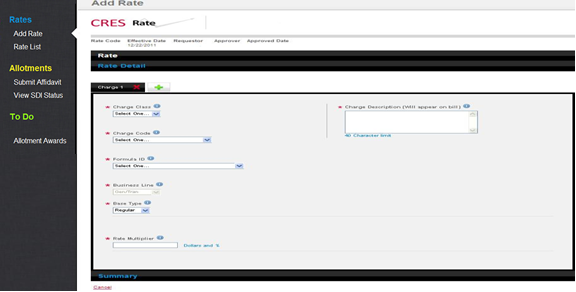
- Charge Class: Required
field – Dropdown list box which will allow you to select the type
of charge being entered
- Charge Code: Required
field - Dropdown list box which allows you to select the charge
to be entered
- Formula ID: Required
field - Dropdown list box which allows you to select how you want
the charges calculated.
- Business Line: Static
– Defines the line of business for each charge. This field
will default to G&T – Generation and Transmission (Ohio Choice).
- Base Type: Required
field - Dropdown list box which allows you to select either regular,
Stepped or Seasonal Rate
- Rate Multiplier: Required
field – This is the rate to be applied in the calculation charge.
Field format allows 7 places either side of the decimal. Enter
flat charge or cost per unit in dollars. Enter percent of discount
as a decimal. (Enter.05 as 5%)
- Charge Description:
Required field – Freeform text that will appear on the charge
line in the provider section of the bill (40 character limit)
and should describe the charge being billed
BASE TYPE
- Select from the dropdown list box one of the following:
Business Type: Stepped
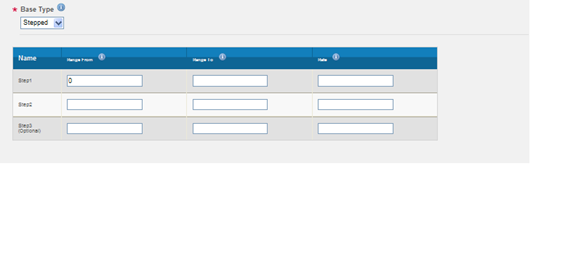
- Enter Step Range From and To as well as the Rate.
- Base Type: For this example is stepped
- Range From: kW or kWh beginning for the step
- Range To: kW or kWh ending for the step
- Rate: Charge
Example:
Step 1 Range
From: 0 Range
To: 499 Rate .032117
Step 2 Range
From 500 Range To: 999
Rate .030092
Step 3 Range
From 1000 Range To: Rate
.201111
BASE TYPE
Business Type: Seasonal
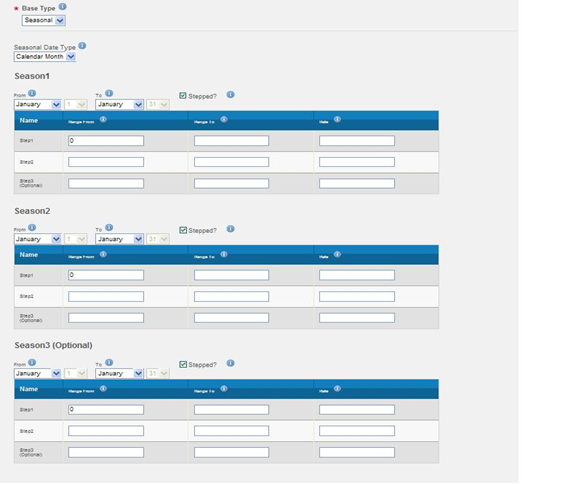
- If Seasonal is selected, the ‘Seasonal Date Type’ field defaults
to Calendar Month.
- Seasonal rate entry will default with 3 seasons checked. If
the user is trying to enter 2 seasons i.e., May to October and November
to April - the check box for season 3 needs to be "unchecked"
- In the dropdown list box, select the ‘From and To’ months for each
season to be entered. Complete the ‘Range From’ and ‘Range To’ and
enter your rate.
- NOTE: Seasonal rates
must cover an entire calendar year. Seasonal Rates have an additional
option of adding STEPS within the Season.
RATE SUMMARY
- Next, click on ‘Rate Summary’
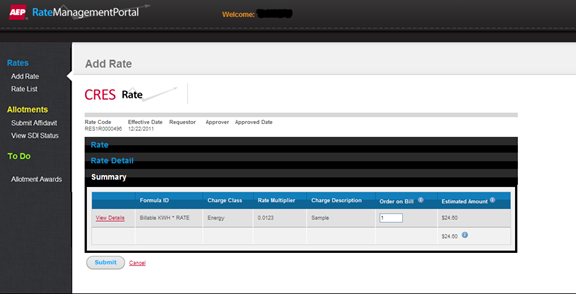
This will allow a ‘reasonable check’ on the
rate entered prior to approving the rate. This calculation is based on
2000 Kwh. If this does not appear correct make modification by selecting
View Details link to go back to Rate Detail screen.
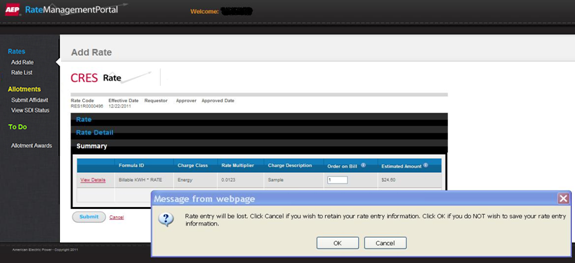
- After you have reviewed your rate, click on the Submit button.
A message will display to Approve or Cancel.
- If you choose Cancel, a message will display confirming action
and the rate entry will be deleted.
APPROVE
Once you click on ‘Approve’,
no further changes can be made.
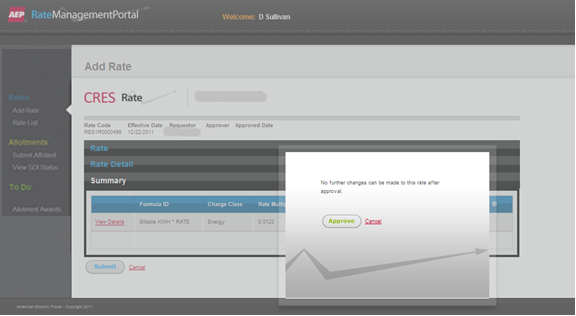
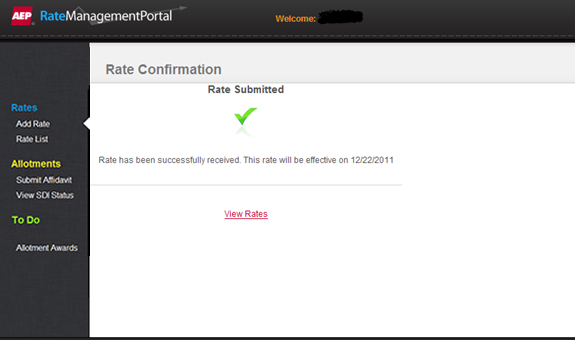
A message will display stating that the rate has been submitted.
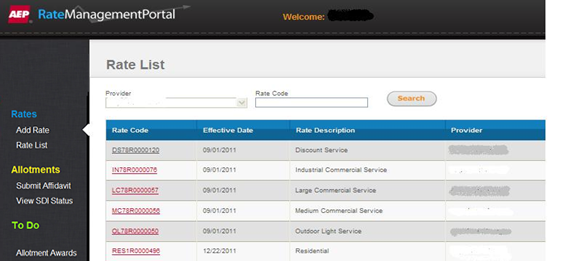
RATE LIST
Clicking on ‘View Rates’ will
allow the user to view all rates entered by user’s provider.
Click on the print icon located on the right
hand corner of the application to print provider entered rates.